Got mangoes? Photo by Serge Penton.
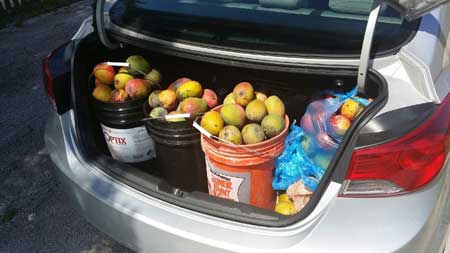
This time of year mangoes are everywhere. There’s plenty to be had from Art’s tree, and the fruit is on sale right now at his Upper Eastside and Southwest Farmers Markets. Sometimes I’m lucky enough to chance upon a roadside stand with people selling off their backyard excess. And sometimes friends bring me mangoes. Last week, my co-worker Serge had his car stuffed with sacks and buckets of mangoes, picked from his tree. “Take as many as you like,” he told me. I scurried off with a bag full of Zills — then came to my senses — I can’t eat all these!
So every summer, the challenge remains, what to do with all those mangoes?
This summer (mostly because it’s been so hot) I decided to make mango ice cream. Non-dairy, vegan ice cream. Don’t worry, I’m still am omnivore, more or less, but lately dairy has dwindled from my diet. Coconut everything is all the rage, so how about… mango-coconut sherbet?
A quick search online came up with a very simple recipe: mango, coconut milk, sugar, lime juice. Serge suggested adding cinnamon, and I also added some ginger. The online recipe called for toasted flaked coconut, used as a topping, but I didn’t have any.
Mango-Coconut Sherbet
Ingredients:
3 cups peeled, seeded, cut up mangoes
1 12 oz. can coconut milk
sugar, lime juice, ginger, cinnamonInstructions:
In a blender, puree mangoes together with coconut milk. Add lime juice, cinnamon, ginger and sugar to taste. When you like the flavors, pour the mix into the ice cream maker, and follow the manufacturer’s instructions. Makes one quart.

Donvier ice cream maker, from the 1980s. Still works!
My trusty, 20 year old Donvier ice cream maker was pulled out of the pantry and put into back into service. It is super simple to use. Freeze the large cylinder overnight, and chill all the ingredients. Then pour the mix into the cylinder, insert the paddle, put the lid on, and attach the turn handle. This is an all-manual operation.

Almost done.
The liquid will freeze in contact with the cold cylinder. Every three minutes, turn the handle, which turns the paddle, which scrapes the frozen mix off the inside wall of the cylinder. Make one turn, then wait three more minutes, then do it again. If you wander off and come back 10 minutes later, you’ll discover it’s impossible to turn the handle. That’s where a butter knife comes in handy, to break up the frozen mix. Don’t break the paddle! Keep turning every three minutes until everything is frozen. The ice cream (or sherbet) will be of soft serve consistency. Pack it into containers and freeze it for at least an hour to firm up.
If you can’t find a Donvier, take a look at the Cuisinart ice cream maker which goes for about $70-80 on sale. Like my all manual Donvier, it has a cylinder that needs to be frozen overnight. For the added price, you get a motor that turns the paddle for you. How easy can it get! Now, to mix up another batch of mango sherbet…

Mango-Coconut sherbet


